©2010 Google -
Code Home -
Terms of Service -
Privacy Policy -
Site Directory
Google Code offered in:
English -
Español -
日本語 -
한국어 -
Português -
Pусский -
中文(简体) -
中文(繁體)
This article was written and submitted by an external developer. The Google Desktop Team thanks Bijoy Thangaraj R for his time and expertise.
Does your gadget have the same face throughout the day? If so, it needs a makeover!
Have you ever wondered how effects like sliding menus, zooming images, fading text, and rotating images are implemented? In this article, we demonstrate how to produce these effects, provide appropriate code snippets, and point to related gadgets that take advantage of these advanced techniques.
As we will be referencing a lot of gadgets in this article,
you should know how to extract
the source code for an installed gadget. You can inspect the source
files by simply changing the extension of the gadget from .gg to
.zip, and unzipping the file.

In this article, I cover three basic types of transformations:
Most of the animation effects use one or a combination of these three basic transformations. For example, sliding menus and elements in motion use translation, while zoom in/out effects use scaling. Apart from these three basic animation techniques, varying an element's opacity can be employed to produce fading effects.
Animation effects make extensive use of the
beginAnimation function:
beginAnimation("Animate()", start_value, end_value, duration);
The
beginAnimation function starts an animation timer
and repeatedly executes the script in the Animate() callback
function for duration milliseconds. Every time the callback
function is invoked, the event.value variable will contain an
integer value in the range from start_value to end_value.
The event.value is then used in the
callback to implement the animation effects.
Please refer to the
Gadget API Reference to get a better idea about the
beginAnimation function.
Translation can be achieved by varying the x coordinate, y coordinate, or both. The following code snippet shows how to move an element along the x-axis, thereby producing a horizontal motion:
// Function for Horizontal movement along thex-axis.
function MoveX() {
  // Variable to hold the starting co-ordinate. var x;
  var move_by;
  x = item_to_animate.x;
  // Move by 100 pixels.
  move_by = 100;
  anim = beginAnimation("Animate()", x, x + move_by, 2000);
}

// This function is called 100 times during  a 2000 milliseconds interval
function Animate() {
  item_to_animate.x = event.value;
}
To move the element vertically, we need to vary the y coordinate. In similar fashion, we can vary both x and y coordinates simultaneously to implement diagonal motion.
Example gadgets using translation effects are:
For the rotation effect, we need to specify the degrees by which
the gadget will be rotated. In the
Clock gadget (analog version), we can see that the rotation property
of the element is varied every second/minute/hour. If we need to rotate in a
smooth manner we can use
beginAnimation. The prototype for smooth rotation is beginAnimation("Animate()",
start_angle_in_degrees, end_angle_in_degrees, duration).
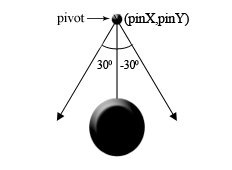
One important thing to note here is that we have to pin the element relative to
a point, around which the rotation occurs. Suppose that we want
to rotate an image relative to the center of the image. Then the value of
pinX should be half the width of the image and the value of
pinY should be half the height of the image.
The rotation effect is demonstrated below using a
pendulum example . Here we are rotating a pendulum image pinned to
the pivot. The direction of the rotation is changed every second using the
setInterval function.
// Variable to determine the current direction of rotation.
var is_clockwise;

// This function is called when the gadget is opened.
function view_onOpen() {
  // Pin the image to the center x co-ordinate.
  // Here, the original width of pendulum_img
  // is 60 pixels.
  pendulum_img.pinX = 30;
  is_clockwise = false;
  setInterval("AnimatePendulum()", 1000);
}

// This function is called every second.
function AnimatePendulum() {
  if (is_clockwise) {
    // Rotate the pendulum by 60 degrees (30 to -30)
    beginAnimation("Animate()", 30, -30, 1000);
    is_clockwise = false;
  }
  else {
    // Rotate the pendulum by 60 degrees (-30 to 30)
    beginAnimation("Animate()", -30, 30, 1000);
    is_clockwise = true;
  }
}

// This function is called every second.
function Animate() {
  pendulum_img.rotation = event.value;
}
Example gadgets using rotation effects:
To simulate a scaling (zooming) effect, we vary the width and height of the element. For zooming-in, we vary the width and height from a smaller value to a bigger value. For zooming-out, the reverse occurs.
In the following code, the image is scaled up (zoomed-in) repeatedly to its original width and height:
function ZoomIn() { // Store the original width and height of the image.
  var img_height = img.height;
  var img_width = img.width;

  // Since we need to vary both width and height
  // simultaneously we use two beginAnimation functions.

  // Increase the width.
  beginAnimation("AdjustWidth()", 0, img_width, 2000);
  // Increase the height.
  beginAnimation("AdjustHeight()", 0, img_height, 2000);
}

function AdjustWidth() {
  img.width = event.value;
}

function AdjustHeight() {
  img.height = event.value;
}
Similarly, in the following code snippet the image is scaled down (zoomed-out) repeatedly from its original width and height.
beginAnimation("AdjustWidth()", img_width, 0, 2000);
beginAnimation("AdjustHeight()", img_height, 0, 2000);
Example gadgets using zooming effects:
Fading effects are used in a lot of places. Practical examples include slideshows, menus, and text animation. In the Google Desktop Photos gadget, a new photo fades-in when the old one fades-out. This results in a smooth transition between the photos.
The opacity of an element can range from 0 to 255. We can create different kinds of fading effects by simply changing the opacity attribute. For example, in the code snippet below, we implement a complete fade-in effect by varying the opacity from 0 to 255 for 2 seconds.
function FadeIn() {
  anim = beginAnimation("Animate()", 0, 255, 2000);
}

// This function is called repeatedly for 2000 milliseconds
// event.value varies from 0 to 255 by time
function Animate() {
  img.opacity = event.value;
}
Similarly, for a complete fade-out effect, we can vary the opacity of the element from 255 to 0. A snippet demonstrating the fade-out effect is given below:
function FadeOut() {
  anim = beginAnimation("Animate()", 255, 0, 2000);
}

// This function is called repeatedly for 2000 milliseconds
// event.value varies from 255 to 0 by time
function Animate() {
  img.opacity = event.value;
}
Example gadgets using fading effects:
In order to stop an animation, you must call the
cancelAnimation function. In gadgets like
Christmas Frame, one animation may have to be stopped before another one starts. It is best to clear the token after cancelling the animation.
The following code snippet
shows how this is done.
//Clear the 'anim' variable if already animating
//Always check these conditions
if (anim == null) {
  anim = beginAnimation("Animate()",255,0,10000);
} else {  // Already animating
  cancelAnimation(anim);
  anim = null;
  anim = beginAnimation("Animate()",255,0,10000);
}
We can use setInterval to create a timer that peridocially calls an animation function. An example of this is the In
the News gadget's initial "Loading" screen.
Here's a code snippet for a repeating animation:
...
timer = setInterval( "AnimateLoading()", 1000);
...
function AnimateLoading() {
  if (anim) {
    cancelAnimation(anim);
    anim = null;
  }
  anim = beginAnimation("Animate()",0,360,1000);
}

function Animate() {
  loading.rotation = event.value;
}
Two very useful JavaScript functions,
Math.sin() and
Math.cos(), can be used to produce nice animation effects
such as snowfall, rotation, or a wavy motion. For example, the snowfall effect
in the Countdown
to New Year gadget uses the Math.sin() function. For sample uses of these functions, check
out these reference gadgets.
Reference gadgets:
Example gadgets using the Math.sin()
and Math.cos() functions:

The Flower Pot is an advanced gadget where we can see many of the animation effects in action, such as translation and fade-in/fade-out. The blooming flowers and simulated rain add life to the gadget.
Let's have a closer look at how the rain effect is achieved
in the Flower Pot gadget. The parameter animated is a
<div> containing images for water droplets. The
y coordinate of the droplets is altered to move the droplets down. Moreover,
the opacity of the droplets are also varied to add a 3-D look. The function
GetRandomOpacityDelta() returns a random value which determines the opacity of
the rain drops.
Below is an extract of code involved in the rain effect:
...
  //Animation function call
  animationTimer = beginAnimation("Animate(animated)", 0, 500, 4000);
...

function Animate(element) {
  var e = new Enumerator(element.children);
  for (; !e.atEnd(); e.moveNext()) {
    e.item().y = Math.abs((e.item().y + 1) % (element.height - 11));

    var delta = GetRandomOpacityDelta();
    var opacity = e.item().opacity + delta;
    if (opacity < 255 && opacity > kMaxRainOpacity - 25) {
      e.item().opacity = opacity;
    }
  }
}
...

//Function that returns random opacity values
function GetRandomOpacityDelta() {
  // Only generate random numbers once
  randomNumbers = [];
  if (randomNumbers == null) {
    for (var i = 0; i < 25; ++i) {
      var rand = Math.random();
      randomNumbers[i] = Math.round((rand * 10.0) / 2.0);
    }
  }

  random_i = (random_i + 1) % 25;
  return randomNumbers[random_i];
}
There is no doubt that using animation techniques will increase your gadget's coolness factor. I hope that the various animation effects demonstrated above, together with the referenced examples, will help you get a better picture of the possibilities offered by the Desktop Gadget API. Additionally, I strongly recommend studying the code of the gadgets mentioned under the Resources section below so you can get a better understanding of these animation techniques.
Happy gadgeting!
cancelAnimation

Bijoy Thangaraj is one of the top Google Desktop Developers. He is extremely passionate about Computers and Technology and especially fascinated by web and desktop gadgets/widgets. His hobbies include composing music and playing musical instruments. Check out his website to know more about him and what he is up to.

This work is licensed under a
Creative Commons Attribution 3.0 United States License.