Software
Documentation
Modifying Hello World
One of the best ways to learn about the gadget API is to modify an existing gadget. This tutorial leads you through modifying the Hello World gadget included in the SDK. You'll change the gadget's XML and JavaScript code, making it do a bit of animation. When the code is complete, you'll package the gadget so others can run it. After finishing this tutorial, you should be ready to start exploring the gadget API.
Note: In general, you should use the Gadget Designer when creating a gadget. You won't need the Gadget Designer for this tutorial because you'll just be tweaking the behavior of an existing gadget.
Contents
- Step 1: Download and Install Google Desktop Software
- Step 2: Make a Copy of the Gadget
- Step 3: Run the Gadget
- Step 4: Edit the Main XML File
- Step 5: Edit the JavaScript File
- Step 6: Run the Modified Gadget
- Step 7: Change the Gadget's Metadata
- Step 8: Package the Gadget
- What to Do Next
Step 1: Download and Install Google Desktop Software
This tutorial uses the Hello World sample that's included in the Google Desktop SDK. To run the sample, you must have Google Desktop installed.
Do this:
- If you're not already running Google Desktop, download Google Desktop and install it.
- Download the SDK. This tutorial assumes you have the most recent version of the Hello World sample.
- Unzip the SDK archive and put it somewhere convenient.
Step 2: Make a Copy of the Gadget
Do this:
- Make a copy of the SDK's
api/samples/gadgets/HelloWorldfolder and name itMyHelloWorld. - Put
MyHelloWorldin a convenient place, such as your desktop.
Before modifying the files under MyHelloWorld,
you should know something about them.
| File Name | Type | Description |
|---|---|---|
en/strings.xml |
XML file | Defines strings used by
the default, English version of this gadget.
To define the "Hello World!" string
that this gadget displays,
en/strings.xml uses the following code:
<HELLO_WORLD>Hello World!</HELLO_WORLD>.
|
background.png |
image | The background of the gadget. Using a PNG image lets this gadget be transparent — whatever's underneath the gadget onscreen is visible through the gadget's corners and shadow. |
gadget.gmanifest |
Google Desktop manifest file | Specifies the gadget's metadata, such as its ID, version, minimum Google Desktop version, name, and description. |
icon_large.gif |
image | A 32x32-pixel icon associated with the gadget. |
icon_small.png |
image | A 24x24 version of the gadget's icon, with transparency. |
main.js |
JavaScript source file | Implements a click-handling function. |
main.xml |
XML file | Defines the gadget's appearance and specifies which function handles clicks. |
Step 3: Run the Gadget
The next step is to run your copy of Hello World, both to make sure it works and to see what it does.
Do this:
-
Open your
MyHelloWorldfolder. -
Double-click the
gadget.gmanifestfile. You should see an installation dialog.

If you have any problems running yourMyHelloWorldgadget:- In the SDK's
api/samples/gadgetsfolder, open a sample gadget's subfolder, such asMenuItems. - Double-click the sample gadget's
gadget.gmanifestfile. - If the sample gadget successfully starts,
something is wrong with your copy of Hello World.
Make sure
MyHelloWorldhas all the files shown in the table. - If you can't run the sample gadget, reinstall the latest version of Google Desktop from http://desktop.google.com.
- In the SDK's
-
Click OK in the installation dialog.
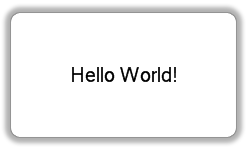
You should now see the Hello World gadget,
either in the Sidebar (if the Sidebar is visible)
or on your desktop.

-
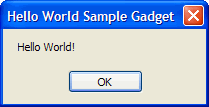
Click the text inside the gadget.
A dialog appears.

- Close the dialog.
-
Close the gadget
by moving your cursor over the gadget
and clicking the "x" that appears.

Now that you've seen what Hello World does, it's time to make it a little more interesting. In the next couple of steps, you'll change the code so that the text spins around once when the user clicks it.
Step 4: Edit the Main XML File
Here's the old code in the main.xml file:
<!-- OLD code -->
<view width="250" height="150">
  <script src="main.js" />

  <img src="background.png" />
  <label x="0" y="60" align="center" width="250" size="15" enabled="true"
    onclick="onTextClick();">&HELLO_WORLD;</label>
</view>
The preceding XML code defines the gadget's display:
a view containing a background image and a label that displays
"Hello World!".
The code also specifies that the gadget has scripting code
in the file main.js,
and that the onTextClick function
(defined in main.js)
should handle user clicks on the label.
To spin the text,
you'll need to add a bit of code to main.xml.
The first thing to add is a name (mylabel) for the label,
so that the JavaScript code
can change the label's properties.
A few other changes are needed
to make the spinning look good —
specifying the label's position differently
and defining the point of rotation
with pinX and pinY.
Do this:
- Open
MyHelloWorld/main.xmlin a text editor that can handle UNIX-style line endings. (WordPad works; NotePad doesn't.) - Edit the file so that it has the following code. (Changes are highlighted in orange.)
<!-- NEW code -->
<view width="250" height="150">
  <script src="main.js" />

  <img src="background.png" />
  <label x="125" y="70" align="center" width="250" size="15" enabled="true"
    name="mylabel" pinX="125" pinY="8"
    onclick="onTextClick();">&HELLO_WORLD;</label>
</view>
Step 5: Edit the JavaScript File
Here's the old code in the main.js file:
// OLD code
function onTextClick() {
  view.alert(HELLO_WORLD);
}
This code defines an event handler that displays a dialog. The event handler is called whenever the user clicks the text in the gadget.
Do this:
- Open
MyHelloWorld/main.jsin a text editor. - Edit the file so that it has the following code. (Changes are highlighted in orange.)
// NEW code
function onTextClick() {
  view.beginAnimation(doRotation, 0, 360, 500);
}
function doRotation() {
  mylabel.rotation = event.value;
}
This code makes the text spin clockwise exactly once,
taking half a second (500 milliseconds) to do so.
It does this by setting the angle (rotation)
of the label multiple times,
starting with an angle of 0 degrees
and increasing to a final angle of 360 degrees.
The beginAnimation method
kicks off the animation
by setting up a timer that
repeatedly does two things:
sets event.value and then
calls doRotation.
The doRotation function
changes the text's angle
by setting the label's rotation property
to event.value.
Step 6: Run the Modified Gadget
Now that you've edited the main.js and main.xml files,
you can run your gadget!
Do this:
- Double-click your gadget's
gadget.gmanifestfile. - Click OK in the installation dialog.
- Click the text in the gadget.
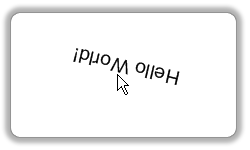
The "Hello World!" text will spin completely around once, as caught midway through in this figure:

Step 7: Update the Gadget's Metadata
Now that your gadget is working, you need to update its metadata. The most important string to change is your gadget's ID. For both your gadget and the original gadget to run at the same time, each one needs to have a unique ID.
Do this:
- Open
MyHelloWorld/gadget.gmanifestin a text editor. - Generate a unique identifier for your gadget
using a command such as
uuidgen,Guidgen.exe, orUuidgen.exe. If you don't have any of those tools, search the Web for[uuid generator]. - Change the
<id>value ingadget.gmanifestto be the unique identifier you just generated. - Optionally change the
<author>value ingadget.gmanifest. - Save your work.
- Open
MyHelloWorld/en/strings.xmlin your text editor. - Update
strings.xmlwith the gadget's new name, description, copyright, website, and about information. - Save your work.
Step 8: Package the Gadget
So far,
you've been running your gadget
by double-clicking its gadget.gmanifest file.
That's fine while you're debugging,
but a finished gadget needs to be packaged into a single file
for distribution.
In this step, you'll create a .gg package —
a ZIP archive
of the files that define your gadget's appearance and behavior.
You can then double-click the .gg file
to run the gadget.
Do this:
- Remove any unnecessary files from the
MyHelloWorldfolder. For example, remove automatically created backup andThumbs.dbfiles. - Create a ZIP archive of the files and folders
that are inside the
MyHelloWorldfolder. On Windows, you can do this by selecting everything in theMyHelloWorldfolder, right-clicking a file, and choosing Send To > Compressed (zipped) Folder.Note: The structure of the ZIP file should match the
MyHelloWorldfolder's structure. For example,gadget.gmanifestandmain.xmlshould be at the top level of the ZIP file, not in a folder. - Change the ZIP file's name to
MyHelloWorld.ggand put it in a convenient place, outside of theMyHelloWorldfolder. - Double-click the
.ggfile. If your gadget starts running, you're done!
What to Do Next
If you want to keep on playing with Hello World, here are some ideas:
- Run the gadget and observe what Google Desktop handles automatically:
- Start the gadget with the Sidebar visible, and then with it hidden. See what happens when you drag the gadget into and out of the Sidebar.
- Observe what happens to the gadget when it's in the Sidebar and you resize the Sidebar or the gadget.
- When the gadget is on the desktop, choose different Zoom levels from the gadget's menu.
- Experiment with the background image:
- Change the background image
by substituting a different file for
background.png. - Delete the background image by removing the
<img>element frommain.xml. The gadget will still appear, but clicking on the text won't usually work. (A label must be on top of a colored div or an image for the label to detect clicks on its background.)
- Change the background image
by substituting a different file for
- Look at the
labelreference documentation, and then modifyMyHelloWorld's label. For example:- Play with label properties.
- Write an event handler or two. For example:
- Make the text's color change when the cursor hovers over it.
- Move the text whenever the user right-clicks.
- Look at the
viewreference documentation, and then change the resize behavior ofMyHelloWorld's view. - Add sound.
- Translate Hello World into another language. You can find translation information in Internationalization.
Here are some ideas for when you're ready to move on from Hello World:
- Modify another gadget.
- Follow another tutorial.
- Read Creating a Gadget.
- Browse the Gadget API Reference.