©2011 Google -
Code Home -
Site Terms of Service -
Privacy Policy -
Site Directory
Google Code offered in:
English -
Español -
日本語 -
한국어 -
Português -
Pусский -
中文(简体) -
中文(繁體)
Software
Documentation
Using Gadget Designer
With the Gadget Designer application for Windows, you can easily create a Desktop gadget from scratch. Gadget Designer is also useful for modifying existing gadgets, such as when you need to change a gadget's user interface or repackage a gadget.
This tutorial leads you through the process of creating a simple gadget. After completing this tutorial, you should be comfortable using Gadget Designer's major features.
Contents
- Step 1: Download and Install Software
- Step 2: Create a New Gadget
- Step 3: Add a UI Element
- Step 4: Add Event Handling
- Step 5: Get Debugging Output
- Step 6: Customize Strings and Settings
- Step 7: Package the Gadget
- What to Do Next
Step 1: Download and Install Software
Do this:
-
If you're not already running Google Desktop,
download Google Desktop
and install it.
Note: During the installation process, a window asks you to choose desktop features. You can change most of the default settings (especially "Improve Google Desktop"!), but make sure the checkbox under Sidebar with Gadgets stays selected.
- Download the SDK.
- Unzip the SDK archive and put it somewhere convenient.
Step 2: Create a New Gadget
Do this:
-
Launch Gadget Designer:
- Navigate to the
api\toolsfolder of the SDK. - Double-click the
designer_en.exefile.
The Gadget Designer application should appear.
Note: If you see a message warning that the application failed to start because a .dll file could not be found, unzip the SDK again. Then make sure you execute the copy of
designer_en.exethat is in theapi\toolsfolder of the unzipped SDK, so that Gadget Designer can find all the files it needs. - Navigate to the
- Choose File > New Gadget...
A file dialog appears. - Choose a name and location for your new gadget folder.
For example, go to your desktop folder, typeMy New Gadgetin the File name field, and click the Save button.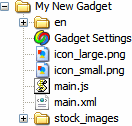
Gadget Designer creates a folder for your gadget and populates it with files and folders your gadget is likely to need. A typical setup is shown to the right. If you look at the same folder outside of Gadget Designer, you can see that the Gadget Settings item represents a file named
gadget.gmanifest. - In Gadget Designer,
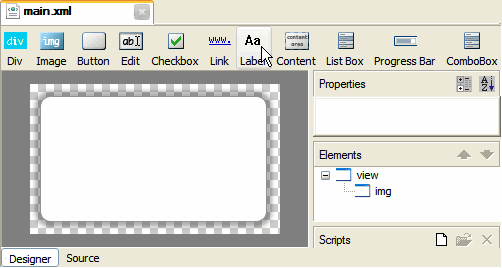
choose the main.xml tab (at the top of the display area)
and then the Source tab (at the bottom).
You should see XML source code for the gadget.<view height="150" width="250" onopen="view_onOpen()"> <img src="stock_images\background.png"/> <script src="main.js" /> </view>
This automatically generated code creates the gadget's main view, which has a size of 250x150 pixels. The view contains a default background image and refers to JavaScript code — specifically, to an event-handling function namedview_onOpen()— in a file namedmain.js. You'll editmain.jslater. - Choose View > Preview or press F5.
The gadget runs in the display area at the center of Gadget Designer. In addition to the background image, the gadget has window controls. These controls don't necessarily match what you see when the gadget runs in the sidebar or on the desktop, but they give you access to the gadget's menu.
The Preview tab is a good way to check on your gadget.
However, to see how your gadget behaves and looks
under normal running conditions,
you still need to run the gadget in Google Desktop.
You can install and run your gadget in Google Desktop
by double-clicking the gadget.gmanifest file
in your gadget's folder.
Step 3: Add a UI Element
Gadget Designer lets you drag user interface (UI) elements such as labels and buttons into your gadget. You can then use the Properties pane to edit each element's properties so that it looks the way you want.
Do this:
- In Gadget Designer,
choose the main.xml tab (at the top)
and then the Designer tab (at the lower left).
You should see a row of UI elements just below the top tabs. - Drag a label element into the center of the gadget.
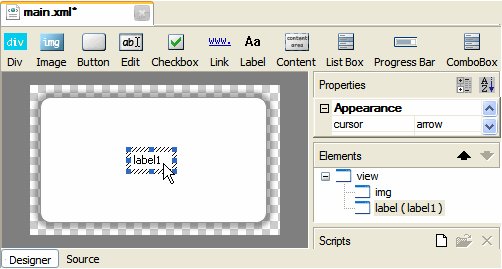
After you add the label, the main.xml tab has an asterisk (*) indicating that the gadget has changed and should be saved. - Save the gadget,
using File > Save
or Ctrl+S.
The asterisk in the main.xml tab disappears.Note: Save often! If you make a mistake, you can use Edit > Undo (or Ctrl+Z) to undo your changes. If you undo too much, use Edit > Redo (or Ctrl+Y) to reapply changes.
- Use the Properties pane to change the label:
- If the label isn't already selected,
select it.
To select the label, either click it in the display area or click thelabelitem in the Elements pane. The Properties pane shows the values of the selected element's properties. For example, the label'salignproperty is initiallyleft. - Click the A-Z icon in the Properties pane
to sort the properties alphabetically.

- Set the value of each of the following label properties.
Property New Value Explanation aligncenterCenters the text within the label. innerTextHello WorldSets the text displayed by the label. width100%Makes the label as wide as the entire gadget. x0Positions the label at the left edge of the gadget.
To set a property's value, just find the property in the Properties pane, click the cell containing the property's value, and enter the new value. For more information onlabelproperties, see the API reference documentation forlabel.
- If the label isn't already selected,
select it.
- Run the gadget in the display area
by clicking the Preview tab or pressing F5.
Your work is saved, and you should see an updated view of the gadget. - Look at the gadget's code by clicking the main.xml tab
and then the Source tab (at the bottom).
The source code should look something like this:<view height="150" width="250" onopen="view_onOpen()"> <img src="stock_images\background.png"/> <label height="16" name="label1" width="100%" x="0" y="58" align="center" >Hello World </label> <script src="main.js" /> </view>
The only difference from the default code is the newlabelelement (shown in orange) that you added.
Besides changing the XML through direct manipulation,
as you did in this step,
you can also edit the text of the main.xml file
in Gadget Designer.
Caution:
Don't put comments or JavaScript in main.xml.
Because Gadget Designer regenerates the XML,
any non-XML markup disappears.
Step 4: Add Event Handling
In this step, you add event-handling code to make your gadget respond to user clicks.
Do this:
- In Gadget Designer, choose the main.xml tab and then the Designer tab.
- Double-click the gadget's label in the display area.
A new tab opens that contains the code for the gadget's JavaScript file (main.js), and that includes the skeleton of a function (label1_onclick()) to handle click events. If you go back to the main.xml tab and look at the label's properties, you can see that theenabledproperty is now set toTrue, and theonclickproperty is set tolabel1_onclick(). - Add the code shown in orange to
main.js:function view_onOpen() { } function label1_onclick() { view.alert("hello world!"); }
This code responds to click events by bringing up a dialog box containing the text, "hello world!". - Save your changes (Ctrl+S).
- Click the Preview tab or press F5.
- Click the label.
You should see the following dialog.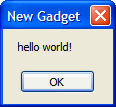
Clicks are just one kind of
event supported by all elements.
To learn about other events such as focus events,
read the
basicElement API reference.
Gadget Designer makes it especially easy to register handlers for click events,
but it's simple to register any other kind of event handler.
Just make sure the element's enabled property is true,
add a function to main.js
that reacts to the event,
and connect the function by setting the value of
an event property (such as onfocusin)
in main.xml.
Step 5: Get Debugging Output
Your gadget can produce debugging strings using the
gadget.debug object.
The Debug Console lets you view these strings
Do this:
- Return to viewing
main.js, either by clicking the main.js tab or by double-clickingmain.jsin the Gadget Explorer. - Add the code shown in orange to the
view_onOpen()method:function view_onOpen() { debug.info("starting..."); }
This code creates a message whenever the gadget starts up and is in debug mode. Ordinary users won't see this message. - Save your changes (Ctrl+S).
- In the View menu, make sure the
Debug Console item is selected.
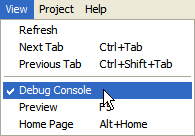
A series of buttons and a text area appear at the bottom of the Gadget Designer window.
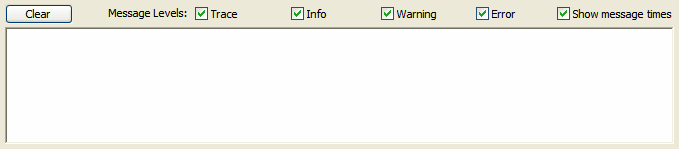
- Make sure the Info checkbox is selected.
- Click the Preview tab or press F5.
At the bottom of the Gadget Designer window you should see a line containing the message level ("Info: ") and the string that you specified to thedebug.infomethod ("starting..."). If Show message times is selected, the line also contains the time when the message was created.

A gadget's debugging strings are generated
only when the gadget is in debug mode.
To execute a gadget in debug mode,
preview the gadget in Gadget Designer
or double-click the gadget's gadget.gmanifest file.
Step 6: Customize Strings and Settings
In this step, you customize your gadget's standard strings —
no more "New Gadget" in window titles!
You also specify settings for
the gadget.gmanifest file.
Do this:
- In the Gadget Explorer
(at the left of the main window),
open the
enfolder and double-clickstrings.xml.
A new tab named strings.xml appears, and the editable contents of thestrings.xmlfile appear in the display area. This file defines default strings for the elementsGADGET_NAME,GADGET_DESCRIPTION, andGADGET_ABOUT_TEXT, which are used for gadget settings.
- Edit
strings.xmlto customize the strings for this gadget, as shown below in orange.<strings> <GADGET_NAME>Hello World</GADGET_NAME> <GADGET_DESCRIPTION>The canonical first program</GADGET_DESCRIPTION> <GADGET_ABOUT_TEXT>Hello World © 2008 This gadget puts up an alert when you click the label.</GADGET_ABOUT_TEXT> </strings>
Defining user-visible strings instrings.xmlhelps make your gadget easier to translate. - Save your changes (Ctrl+S).
- Click the Preview tab or press F5.
The title of the gadget shown in the display area changes to "Hello World". If you open the gadget's menu and choose About..., you see the new About text that you specified. - Double-click the Gadget Settings item in the Gadget Explorer
or press F3.
A window appears that has contents like this:
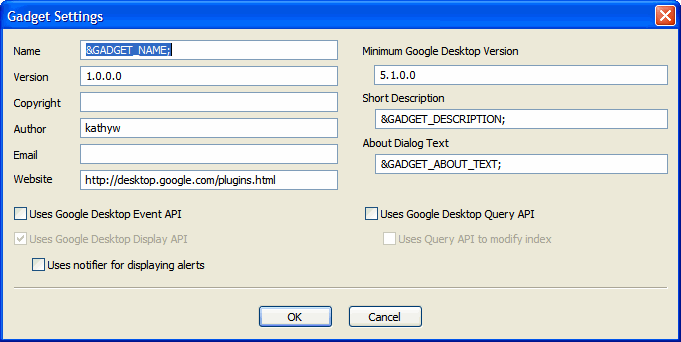
The Name, Short Description, and About Dialog Text fields are the only ones that can refer to elements (such asGADGET_NAME) defined in thestrings.xmlfile. All other fields must have either no value or the actual string value. See The about element for details. - Enter values for at least
the Author and Email fields.
Examples:
Jo Wu,jowu.feedback+MyNewGadget@gmail.com
These fields correspond to the requiredauthorandauthorEmailelements in thegadget.gmanifestfile. Providing good values for these elements helps you get credit and feedback for all of the gadgets you develop! For information about these and other fields, see What Goes into a gadget.gmanifest File.
You're almost done.
Step 7: Package the Gadget
A finished gadget needs to be packaged
into a single file for distribution.
In this step, you use Gadget Designer
to create the gadget's .gg file.
Users can then double-click the .gg file
to run the gadget.
Do this:
- Outside Gadget Designer,
go to the folder
stock_images. - Delete every file from
stock_imagesexcept forbackground.png
Removing unnecessary files makes your gadget's.ggfile smaller, reducing gadget download time. - Back in Gadget Designer,
choose Gadget > Build Package
or press F7.
A dialog appears, telling you where Gadget has placed your gadget's.ggfile. - Outside Gadget Designer,
move the
.ggfile out of your gadget's folder, and double-click the.ggfile to run the gadget.
Your gadget should run and look something like this: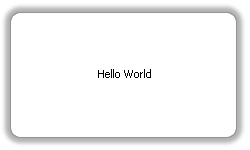
What to Do Next
This tutorial introduced you to all the major features of Gadget Designer, from creating a gadget to implementing, debugging, and packaging it.
If you want to keep on playing with the gadget you just created, here are some ideas:
- Experiment with debugging output. For example, try using
debug.error()anddebug.warning(), and try unselecting checkboxes in the Debug Console. - Use
api\tools\gdpconsole.exeinstead of Gadget Designer to view debugging output. Remember to run the gadget in debug mode by double-clicking the.gmanifestfile. - Test your gadget on a Mac.
Here are some ideas for when you're ready to move on from this gadget:
- If you haven't already completed the Modifying Hello World tutorial, do so. Don't miss that tutorial's What to Do Next section.
- See the Gadget Design and Testing guidelines.
- Read articles.